In order to request certificates manually or automatically, for example for wireless access, you need to configure Dell Wyse ThinOS to request certificates. This process requires you have the Network Device Enrollment Service (NDES) role setup in your environment. This is what implements Simple Certificate Enrollment Protocol (SCEP), which is used to issue certificates.
The setup outlined here uses a Microsoft Windows Server 2012.
In addition to having an internal Certificate Authority setup in your Active Directory environment you will also need the Network Device Enrollment Service (NDES) role installed. This is role/service that implements the Simple Certificate Enrollment Protocol (SCEP) used to issue certificates.
If not already setup, you can setup your Certificate Authority following steps here.
If not already setup, you can install and configure the NDES server role here.
- The Setup section here outlines exact steps to setup your NDES server to start handing out certificate.
Issue:
How do you setup Dell Wyse ThinOS to request certificates from your Network Device Enrollment Service (NDES).
Resolution:
You will first need to setup your NDES environment by following steps in requirements section. Once setup your device will be able to request certificates manually or automatically.
Details:
We will first cover the manual process to have the device request a certificate from the NDES server.
1. On Dell Wyse ThinOS go to System Tools\Certificates and select “Request Certificate” and the following screen will appear.
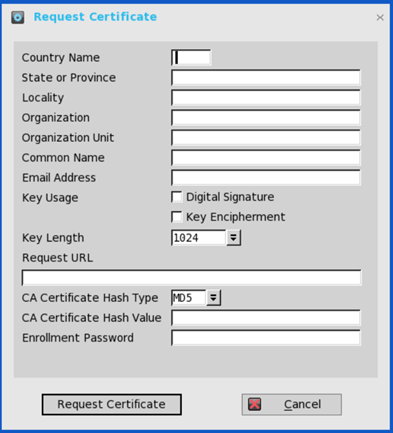
2. Fill in the fields as shown below making note of the following;
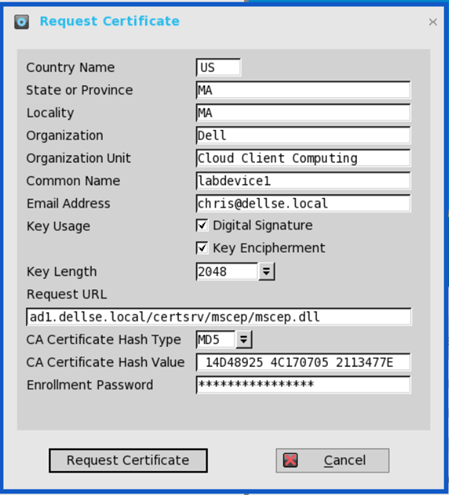
- Request URL: This will be the URL of your NDES server. Note, do not include the prefix, http, otherwise, you will get an error: “failed getting port number.”
- CA Certificate Hash Type: if using MS CA/NDES server then this should remain MD5. Even though your server may issue SHA256 hashed certs, MD5 is what is used to issue the request but cert will be signed however you have them configured, i.e. SHA1, SHA256, etc..
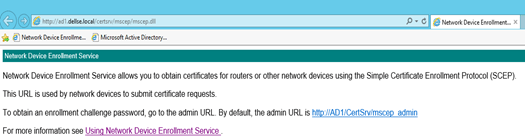
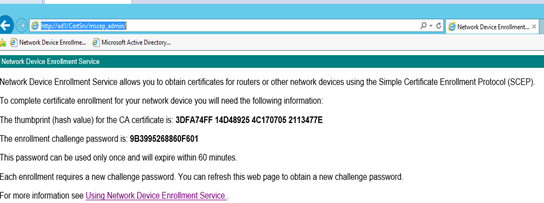
- CA Certificate Hash Value: You will need to browse to the following location on your NDES server; http://hostname/certsrv/mscep/mscep.dll. You will then click link, http://hostname/certsrv/mscep_admin to get the Hash Value and Enrollment Password. * NOTE * Be sure to include spaces in the Hash Value name as it shows on the webpage example below.
-
- Enrollment Password: This will be the password retrieved from above.
3. Once you click “Request Certificate” the client will communicate with the server and return the following:
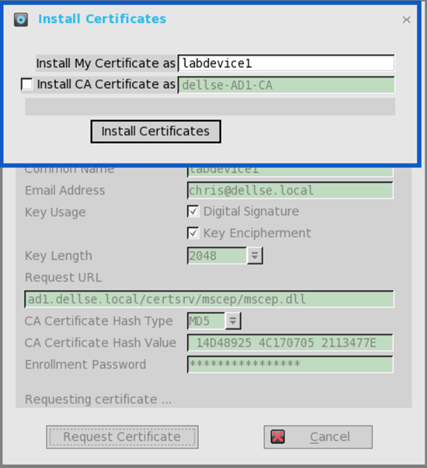
Note: Be sure to check off “Install CA Certificate” so this is also installed otherwise, the certificate will be installed under ‘Unknown’ on client and not be chained correctly.
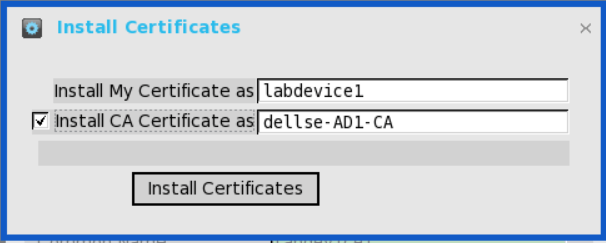
4. Click “Install Certificates” and both certificates will be installed on the client.

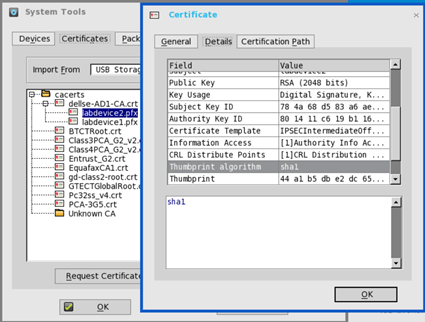
NOTE: You can also verify it has the correct Signature Algorithim, i.e. SHA1 or SHA256 or whatever your CA is set to.
SHA1 Cert:
SHA256 Cert:
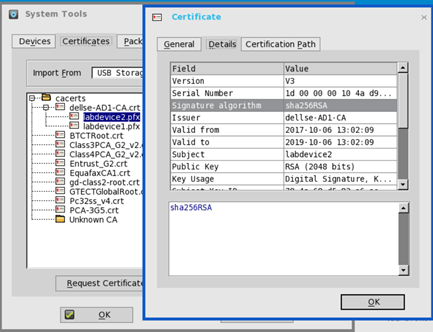
NOTE 1: Even if Signature Algorithm is set to SHA256, the Thumbprint Algorithm will be set to SHA1. This is expected as noted here.
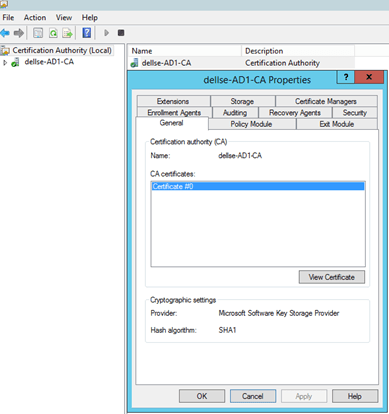
NOTE 2: It is helpful to know what Signature Algorithm your CA uses. You can confirm this from here;
SHA1
SHA256
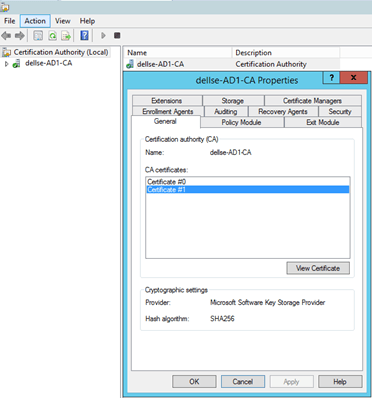
Note: To upgrade your CA from using SHA1 to SHA256 you can follow steps here.
5. This completes process to manually request certificates. In order to Dell Wyse ThinOS request certificates automatically you will have to do this via an INI file or Wyse Management Suite. The values you will use to do this are outlined on the 8.4 INI guide and you can get documentation here.
