[this tool has been replaced with the Dell OS Recovery Tool for newer generation thin clients]
A quick and easy way to re-image a Dell Wyse thin client, especially Windows 10 IoT/Embedded devices, is to use the Wyse USB Firmware Tool. The tool is also used to re-image other models of Dell Wyse thin clients as well but not as often.
You can download the free Wyse USB Firmware Tool here. You will also need to download the firmware image you want to re-load back onto the thin client. You can access the images you need directly from the Dell support site here.You will also need a USB drive to copy the image onto which you will then put into the device you want to re-image.
The process is outlined in the user guide that you get with the download but it follows these basic steps: (Listed in great detail in official KB article here)
- Download the firmware you want to use for the re-imaging process from above.
- Download the USB Firmware Tool as noted above and launch as an administrator. Be sure to launch as admin as you will get errors if not.
- Follow the steps on the screen from the tool to browse to the image you want to load onto the USB key. Note: Once the image is loading onto the tool it will sometimes appear to hang for a few minutes when it’s actually copying the image onto the key so just an FYI.
- Once the image is on the key you will then place the key into the device you want to image, hold down the ‘P’ key at reboot and once prompted you will select the USB key to start the imaging. Note: if you don’t see the USB key when booting from USB then it’s likely disabled in the BIOS. Hold down ‘delete’ key during boot-up to enter BIOS. BIOS password is ‘Fireport’ (capital ‘F’). You should see USB located under boot options and set to enable then after reboot you should USB key in BIOS.
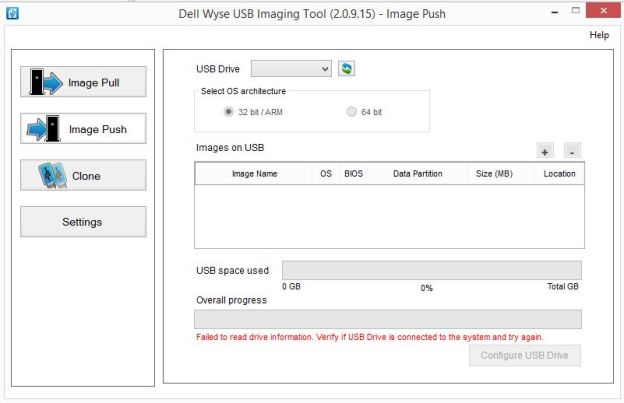
** NOTE ** The USB key must show up as “Removable Disk” or “Removable Media” in Windows Explorer in order for the tool to see the USB drive properly. Some newer keys show up as “Local Disk” and by design, the tool will NOT attempt to use this and you’ll see error “Failed to read drive information. Verify if USB Drive is connected to the system and try again”. The solution is to try another drive and see if it shows up as “Removable Disk” vs “Local Disk” as when you buy the drives they don’t indicate this information so you often need to try a few USB keys to see what works.

This is the error you will see if the drive is not recognized because it appears as “Local Disk” in Windows Explorer: “Failed to read drive information. Verify if USB Drive is connected to the system and try again”.
Be sure to follow the steps outlined in the user guide that’s included with the download as it will contain helpful troubleshooting information as well.
Finally, head on over to the the Dell Wyse Thin Client support forums if you need additional assistance as it’s a great location for troubleshooting issues for the USB Imaging tool as well as the various operating systems.
Here is a great video showing the USB Firmware Tool being used to re-image a Windows Embedded 7 thin client:
@chris_messier ~~> Subscribe to blog to get latest updates <~~
