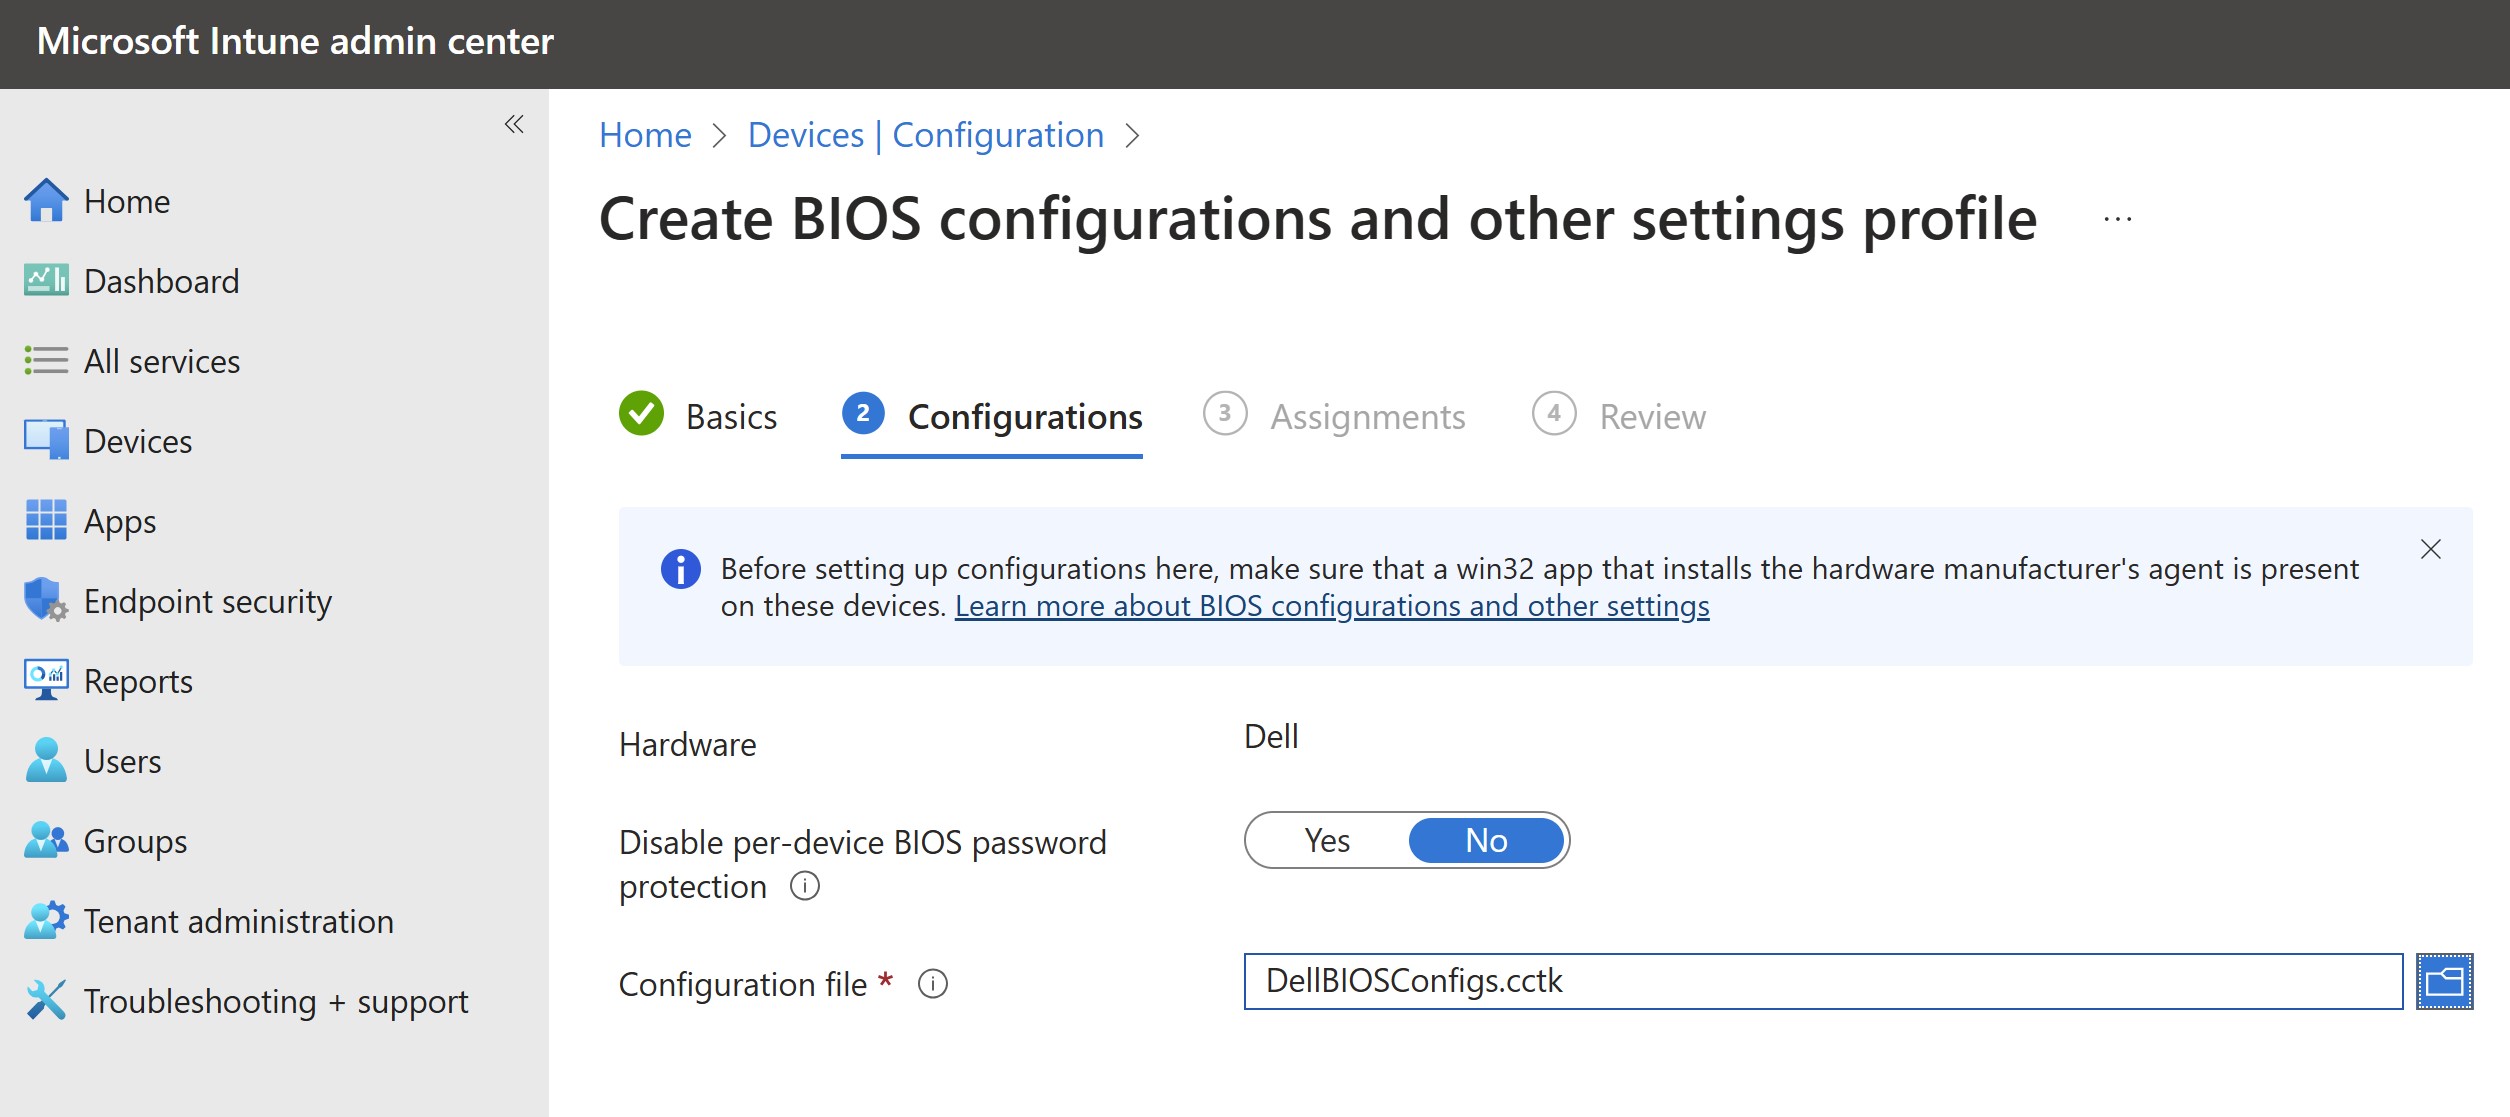
As you might know, Microsoft Intune has quickly become one of the most popular management tools for a managing a companies fleet of devices. Dell recognizes this and has continued to work to integrate and add new tools that integrate directly within Intune so management is done through that single pane of glass.
This allows you the ability to manage & deploy Dell client BIOS settings directly within your Intune portal. You basically deploy the Endpoint Configure application to the client, create a BIOS configuration package and upload that to Intune. Once configuration is in Intune, you can then create the device configuration policy to deploy out to the devices as needed.
Here is a quick overview of what the process looks like;
Here are couple screen shots of what the configurations look like;
One of the options with Wyse Management Suite (WMS) cloud or on-prem is the ability to install a remote repository to host OS images or packages. This isn’t often required, especially with ThinOS, as the images and packages can be hosted centrally in WMS cloud or the main repository as part of your on-prem install. We also can host packages in WMS cloud for Windows 10 IoT & Dell Hybrid client.
In this case, the customer wanted to convert their existing home users who are using Windows 10 IoT based thin clients to Dell ThinOS thin clients using WMS cloud. In order to do this we needed a cloud hosted repository to host this ThinOS conversation image for all the Windows 10 IoT thin clients to download the ThinOS image from. We installed the WMS repository on a Windows Server 2019 VM in Azure and synced it with our WMS cloud portal.
I wanted to outlined the WMS repository installation and Azure virtual machine configuration below.
Review the WMS repository installation prerequisites here in the WMS admin guide in order to configure your Azure, or on-prem VM installation.
2. Download the latest WMS repository installation from the WMS downloads site here
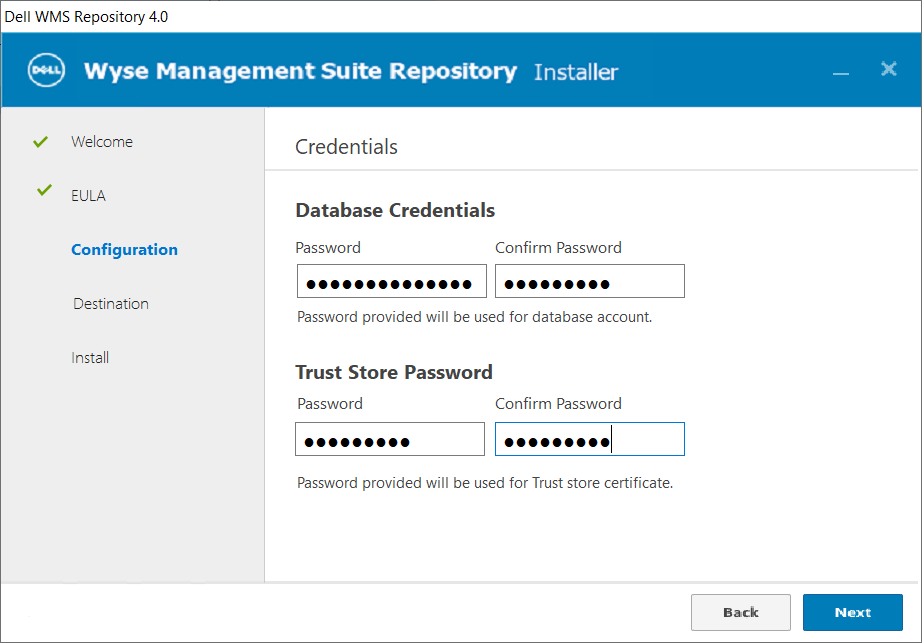
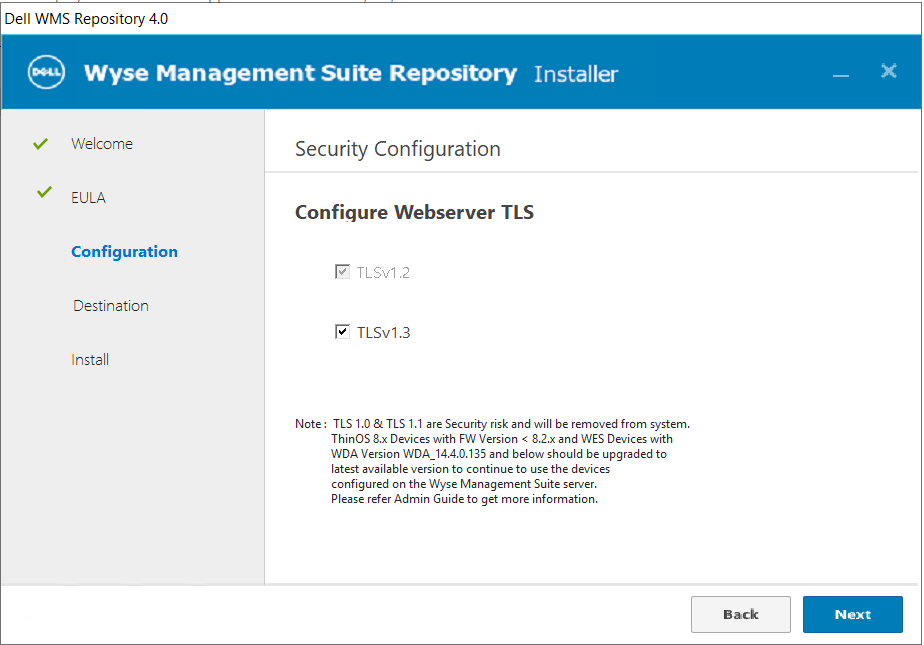
3. Install the WMS repository following the below prompts;
4. NOTE: Once the installation finishes and you click ‘Launch’ it make take 1-2 minutes for the installation to finish, close and then launch the browser, so be patient while it finishes. The WMS repository service is starting and the web page will be unavailable until it starts. You can confirm the services started by looking here:
5. Once the web pages launches, you will be brought to the registration page. Once you are here you have a few options to configure:
The URL of your WMS server
Here we have the option to “Register to Public WMS Management Portal” or specify the FQDN of your on-prem WMS server. In my case, we are going to register to WMS cloud so we will select “Register to Public WMS Management Portal” & select “us1.wysemanagementsuite.com” (or eu1. if you’re using that tenant).
The second important item is the ‘WMS Repository URL“. This will be the URL the client that is downloading the image from will connect to. In my case, since we are using WMS cloud and doing this for remote home based users, we need to make sure that WMS Repository URL resolves externally to my server and is accessible over the Internet. By default, it lists the hostname of the server.
Here I selected “us1.wysemanagementsuite.com” & changed my WMS repository URL to an FQDN that maps to my Azure WMS repository VM: hostname.vditoolbox.com
6. Once you click ‘Register’, it will connect to your WMS management server and register successfully.
7. You can confirm it registered succussfully by looking on your WMS console under Portal Administration\File Repository:
8. At this point, your WMS repository is installed and successfully connected to your WMS portal!
9. From here, in my example I downloaded the Windows 10 IoT to ThinOS conversation image to my Azure repository and synced with my WMS portal. By default, ‘Automatic Replication’ is selected but you can also click ‘Sync Files’ or ‘Check-In’ to ensure the repository is synching & checking in successfully. If you’re doing a conversion as well, you can read more here.
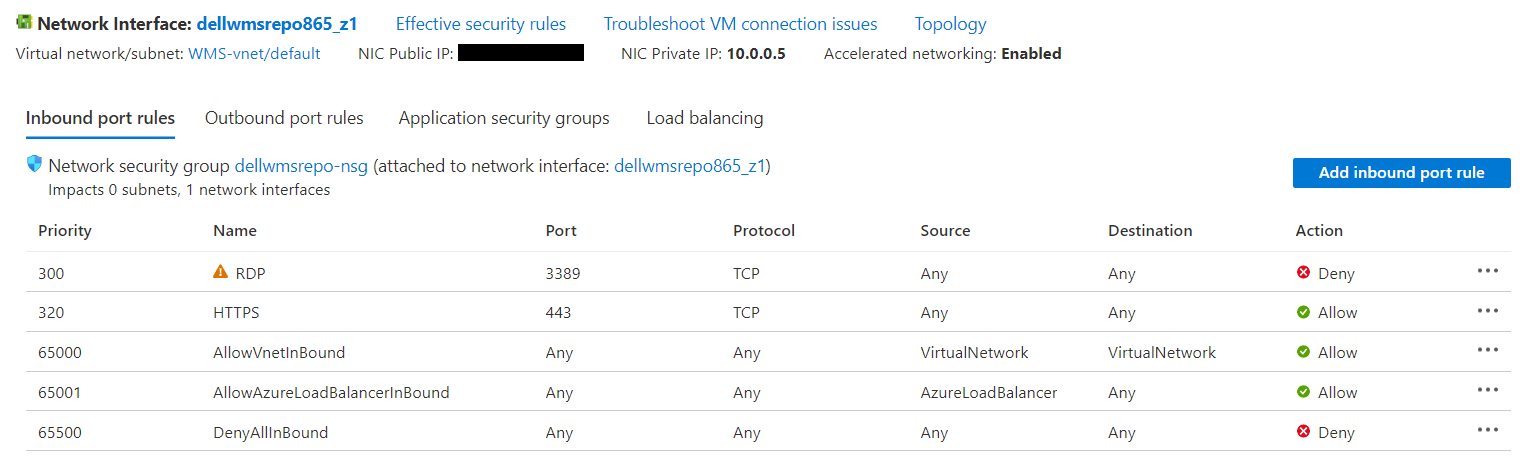
10. The final step is to make sure your Azure VM is accessible externally. In my example, I used hostname.vditoolbox.com that has DNS record that resolves to the public IP address of my Azure VM. I’ve included an example of the lab setup I had during testing and yours will likely be different based on network, security groups, etc.. but wanted to give you an idea.
Troubleshooting:
We initially were receiving an error when pushing the conversion image but not a smaller package. The issue turned out to be an issue with the header and we think the the very long file name compared to that of other package files and it was getting blocked. When the thin client connected to download the image, the Azure Web Application firewall was blocking the connecting and the thin client displaying the following error:
WMS Repository Server is not available or required imaging files are missing. Trying again….Number of Retry = 1
We also saw the following error right before imaging started, followed by the one above:
When we looked at the WMS WDA logs we saw the following:
18/01/2023 13:26:37.376 E 5764 6 Unable to perform http request… 18/01/2023 13:26:37.392 E 5764 6 CCMConnectionData: BaseConnectionString: https://us1.wysemanagementsuite.com:443/Mac: “b0:4f:13:bf:08:f4″OwnerId: “50359860”WyseId: “wyse3826922988332208998″AuthCode: “****”UserAgentHeader: “Stratus /4.7.5.0 (WES 10.0.17763; en-US; Wyse 5470; Revision:14.6.2.13; cls:A)” 18/01/2023 13:26:37.392 I 5764 6 WebException returned ProtocolError – The remote server returned an error: (400) Bad Request.
The Azure administrator then looked at the Azure Web Application firewall logs and saw the following:
REQUEST-920-PROTOCOL-ENFORCEMENT.conf 920450 Restricted HTTP headers: The use of certain headers is restricted. HTTP header is restricted by policy (%{MATCHED_VAR}) Pattern match ^.*$; Within Tx:restricted_headers at REQUEST_HEADERS_NAMES. /wms-repo/image/os?filePath=ThinOS_2211_9.3.3099_WES_Conversion%5CThinOS_2211_9.3.3099_WES_Conversion%5CThinOS_2211_9.3.3099_WES_Conversion\u0026fileName=commandsXml.xml
Once the Azure admin relaxed this rule, the device was able to download the image immediately.
A new Dell Wyse ThinOS enhancement to be aware of is the introduction of a ThinOS Activation License that was introduced as part of ThinOS version 2205 (version 9.3.1129) & Wyse Management Suite 3.7.
This new license is required in certain scenarios as outlined here.
In some cases, you may encounter the following message below:
“Login is denied (ThinOS activation license is not available)”
You will get this for a few reasons as outlined in the release notes here and outlined below.
ThinOS enhancements
Added ThinOS Activation devices licenses in Wyse Management Suite—The licenses must be used in the following two scenarios:
Devices that are converted from other operating systems must use the ThinOS activation licenses to enable VDI function. Without the ThinOS activation license, you cannot log in to any Broker agent on the devices. The ThinOS activation licenses are used automatically when registering to Wyse Management Suite.
For example, you bought Windows 10 IoT/Windows Embedded devices in the past and converted them to ThinOS at one point
If you bought a newer platform, i.e. Dell 3420 thin client laptop and ThinOS was NOT installed at the factory but instead onsite, then you will need the ThinOS Activation license
Non-PCoIP ThinOS clients that are upgraded from ThinOS 8.6 can use ThinOS Activation license to enable the PCoIP function. Go to Services > WDA Settings > Enable PCoIP Activation License to enable this option in ThinOS 9.x policy. Restart your device for the function to take effect
For example, you upgraded ThinOS 8.x without PCoIP and have upgraded to ThinOS 9.x and you use PCoIP with VMware Horizon
Support for Dell Wyse Latitude 3420 Thin Client
You must have ThinOS Activation devices license for Latitude 3420 to enable VDI function
This license takes effect starting with ThinOS 2205/9.3.1129 & Wyse Management Suite 3.7 as noted in the release notes here.
If you are running into this issue after upgrading to ThinOS 2205, you may need to reach out to your Dell account team to likely purchase the appropriate ThinOS Activation License if you fall into one of the categories.
Alternatively, you can roll back to prior versions of ThinOS until you identify the reason you are getting this license message & purchase the proper ThinOS activation license(s).
The new ThinOS Activation License is discussed in greater detail here, Dell ThinOS – Installation & Activation License User Guide. This document also covers installing ThinOS on newer hardware manually such as the Wyse 3420 thin client laptop IF it is not pre-loaded at the factory.
If you use WMS on prem you will need to export your ThinOS Activation License from WMS Cloud to WMS on prem server as noted here.
I recently came across an issue that took some time trying to resolve regarding 802.1x configuration on ThinOS 9.1 that I wanted to share.
Ultimately, the issue came down to the SSL certificate name not matching the certificate name entered into the Wyse Management Suite (WMS) configuration.
When the device was trying to authenticate, it was using a certificate name that didn’t match what was in the WMS configuration and failed to authenticate because of this.
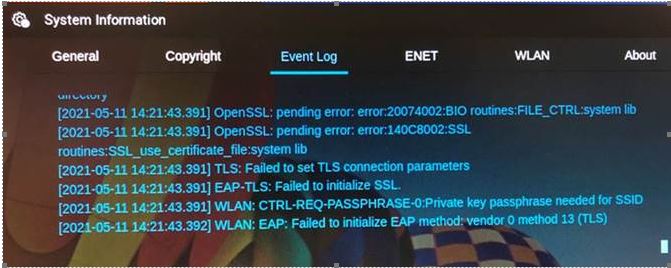
Some errors we received in the event log but weren’t very descriptive although it appeared to be a certificate authentication issue based on ‘private key passphrase needed for SSID’ error message.
TLS: Failed to set TLS connection parameters
EAP-TLS: Failed to initialize SSL
WLAN: CTRL-REQ-PASSPHRASE-0:Private key passphrase needed for SSID
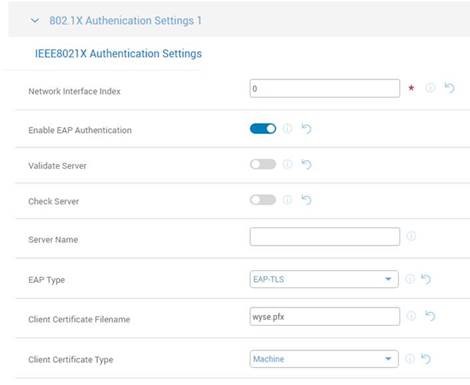
We then looked at the WMS 802.1x configuration and verified the certificate name, in this case, ‘wyse.pfx’ – note the lowercase ‘w‘. We uploaded again to WMS and verified we got prompted for password so that looked correct.
We then looked at actual certificate we uploaded, ‘Wyse.pfx’, and made note of the case – capital ‘W‘ vs the lowercase ‘w‘ that was entered in WMS console so we changed WMS to match certificate name. We changed it from ‘wyse.pfx’ to ‘Wyse.pfx’. Once we did this and rebooted device, it connected to the network successfully!
Lesson learned, it’s never a bad idea to verify case sensitivity and try to make sure they match to avoid this potential pitfall!
I’ve run into a few issues lately where customers are currently using ThinOS 8.x successfully with Citrix Netscaler/ADC but having issues connecting with Dell Wyse ThinOS 9.x.
In more than one case, it’s been an issue with the existing Netscaler Session Policy that was setup specifically for Wyse devices and contains information from the ThinOS 8.x User-Agent HTTTP/S request header that may no longer apply to ThinOS 9.
The ThinOS 8.x User-Agent request header is: CitrixReciever WTOS/1.0
The ThinOS 9.0 User-Agent request header is: “CitrixReceiver”/18.12.0.65534 (X11; Linux x86_64) Warthog/9.0.8024 (Release) X1Class CWACapable
**Update 8/2021 #1 ** ThinOS 9.1 User-Agent request header has been changed to: CitrixReceiver/18.12.0.65534 (X11; Linux x86_64) WTOS/9 (Release) X1Class CWACapable (‘Warthog/9.0.8024′ was replaced with: ‘WTOS/9’)
**Update 8/2021 #2 ** If ThinOS is using the built-in web browser to connect to an MFA site, for example, Okta, Duo, etc.. then the HTTP header will be one of the following:
Mozilla/5.0 (X11; Linux x86_64) AppleWebKit/537.36 (KHTML, like Gecko) Chrome/66.0.3359.181 Warthog/9.0 Safari/537
Mozilla/5.0 (X11; Linux x86_64) AppleWebKit/537.36 (KHTML, like Gecko) Chrome/66.0.3359.181 Electron/3.1.11 Safari/537.36
Note: The following below may not be true if using >9.1 as the http header now again contains “WTOS”.
The issue I’ve seen is many customers using ThinOS 8.x have a Netscaler Session Policies setup to look for a User-Agent to include “WTOS” or “WTOS/1.0” and that does NOT exist in the 9.x User-Agent header so the existing Session Policy will be ignored and not applied.
Network trace from ThinOS 8.6_511:
Network trace from ThinOS 9.0_4024:
Network trace from ThinOS 9.1.2101 / CWA 21.1.0.14.8
To fix this, you have 2 options.
Option #1: Create a new session policy on Netscaler/ADC to contain something from the ThinOS 9.x header, for example, ‘Warthog’ (name for ThinOS 9) so it uses the policy.
Option #2: Wyse Management Suite has the ability to specify the User-Agent header under the WMS Citrix Broker/Netscaler section.
Under ‘Citrix Broker’ settings from ThinOS 8.x policy
Under ‘Broker Settings’ settings from ThinOS 9.x policy
Finally, we also saw an issue where we get the following error; INFO: “Waiting for token to change, then enter the new tokencode”
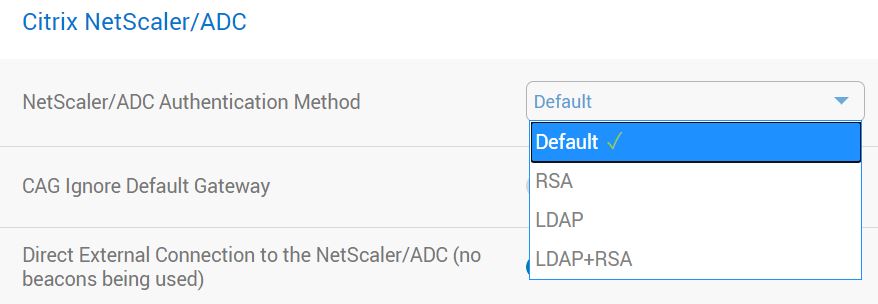
The existing Netscaler/ADC policy was set to have an RSA policy first BUT since that policy was setup using the 8.6, “WTOS”, header, it was going to the second policy and only allowing LDAP, but threw this error. Once we fixed the policy as noted above with proper header, we were able to use or RSA policy as primary, and the LDAP as secondary.
You can configure this behavior under the “Citrix Netscaler/ADC” settings section in the ThinOS 9 policy.
Hope you found this helpful!
@chris_messier ~~> Subscribe to blog to get latest updates <~~
In this post I will cover how to upload SSL certificates into Wyse Management Suite (WMS) and how to assign them to a specific group configuration/profile for ThinOS 8.x and 9.x.
The process is slightly different for ThinOS 8.x & ThinOS 9.x but I will cover both below.
How to upload SSL certificates for use by ThinOS 8.x:
1. In WMS, browse to “Apps & Data”:
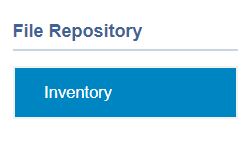
2. Scroll down to “File Repository”:
3. Click “Add File” to upload Certificate:
4. Browse out to the Certificates you exported. You will need to do for each Certificate you exported.
5. Once you click upload it should show up under the ‘Apps & Data – Inventory File Repository”:
How to upload SSL certificates for use by ThinOS 9.x:
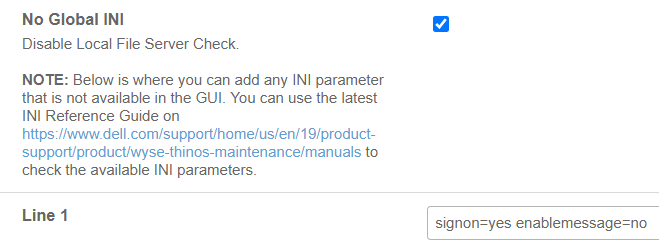
In your ThinOS 9 policy, browse to “Privacy & Security\Certificates”. Here you can turn on “Auto Install Certificates” and browse to the certificates you want to upload as shown below:
How to assign SSL Certificates to WMS configuration group/policy:
Once your certificates are imported into WMS, you then need to assign them to your ThinOS profile you are using under, “Groups & Configs” select the group you want to edit following steps below;
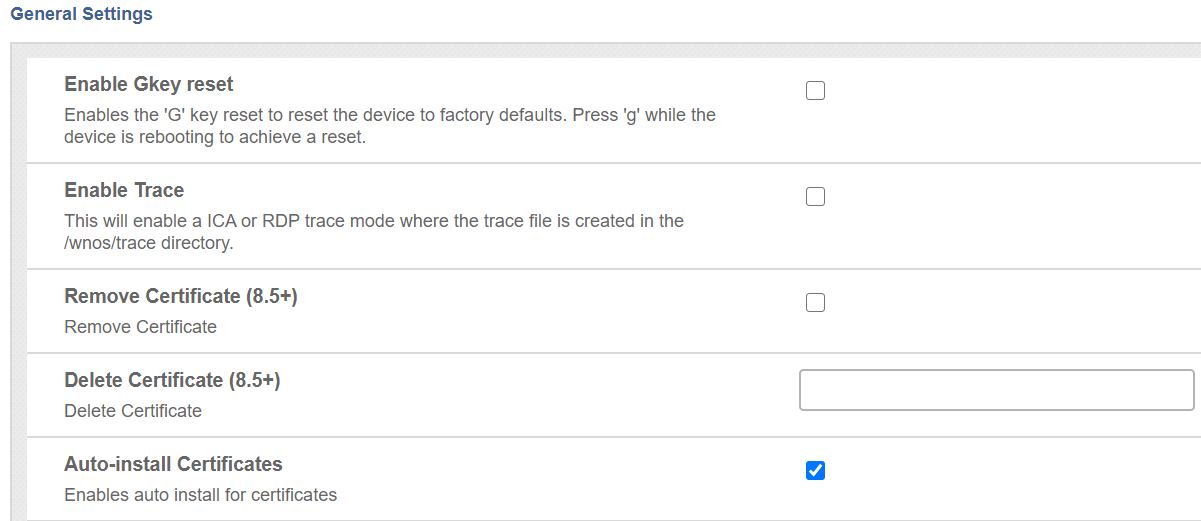
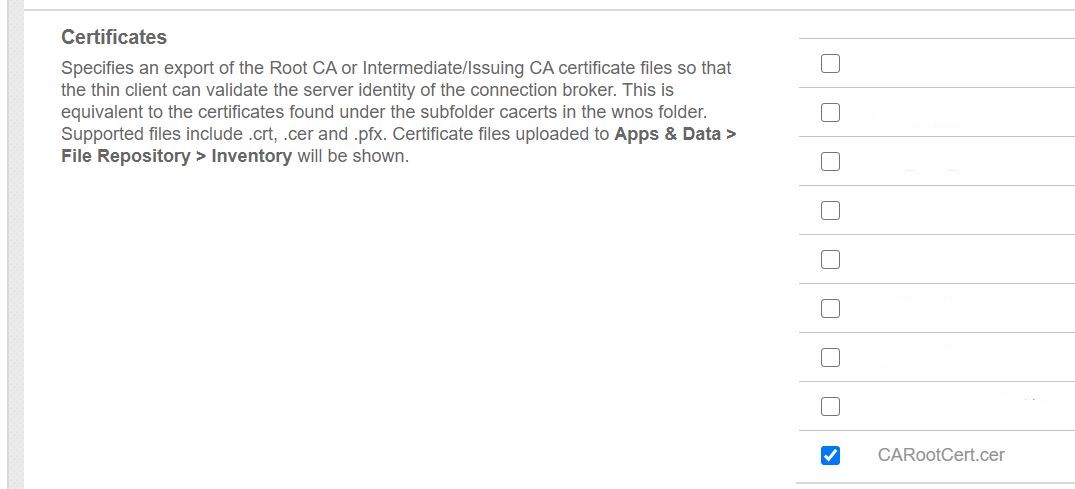
ThinOS 8.x: in the policy, browse to “Device Configuration\Security\General Settings”. Select “Auto-install Certificates” and your Certificate should show up in the list to select. Once you are done, click “Save & Publish”. The next time the device reboots, it will pick up the new Certificate.
ThinOS 9.x: in your policy, browse to “Privacy & Security\Certificates”. Here you can turn on “Auto Install Certificates” and browse to the certificates you want to upload as shown below:
This completes the process of uploading your SSL certificates to WMS and assigning them to a ThinOS policy.
For more assistance, check out Dell Community Forums (formally Dell TechCenter):
A common issue connecting to a VDI connection broker, i.e Citrix, VMware, etc.., from Dell Wyse ThinOS or any thin client, is an SSL certificate error. There are generally 2 reasons why.
the Root Certificate Authority certificate is not installed on the device
the Intermediate Certificate Authority certificate is also not installed on the device
Error: SSL Certificate Authority is Unknown
This is easily fixed by installing both the missing Root and likely the Intermediate certificate.
To do this, you can simply export from a browser, and then import on the device, generally through Wyse Management Suite (WMS) or even a USB key if you had to.
I will cover the 3 step process to fix this.
Export the required certificates from a browser
Upload into Wyse Management Suite
Assign the certificates to the device profile
Steps to export certificate from browser:
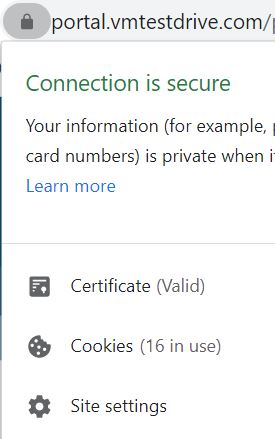
In this example, I used https://portal.vmware.com as an example to work with certificates but this would be your VMware Horizon server, Citrix Storefront site, Citrix Netscaler/ADC, Microsoft Azure MFA site, etc…
Click on the SSL padlock on your browser as shown below to bring up below window. Click on ‘Certificate (Valid)’ field.
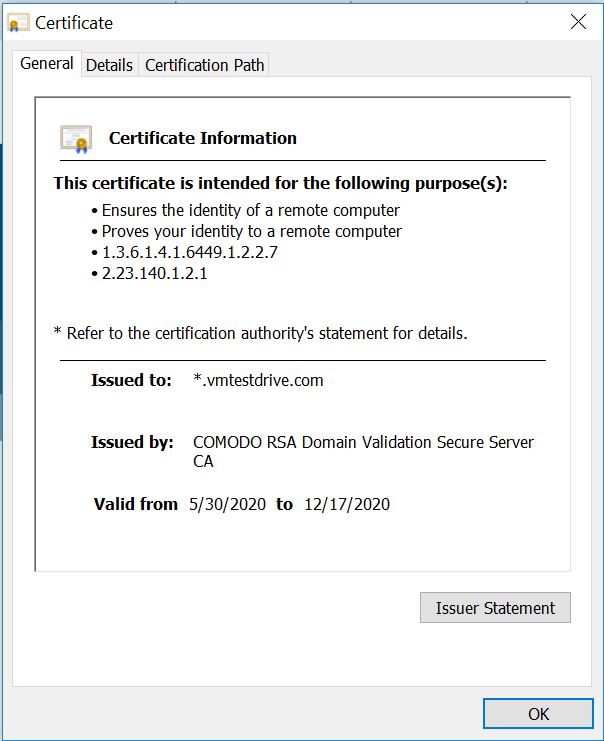
3. This will bring up the certificate information:
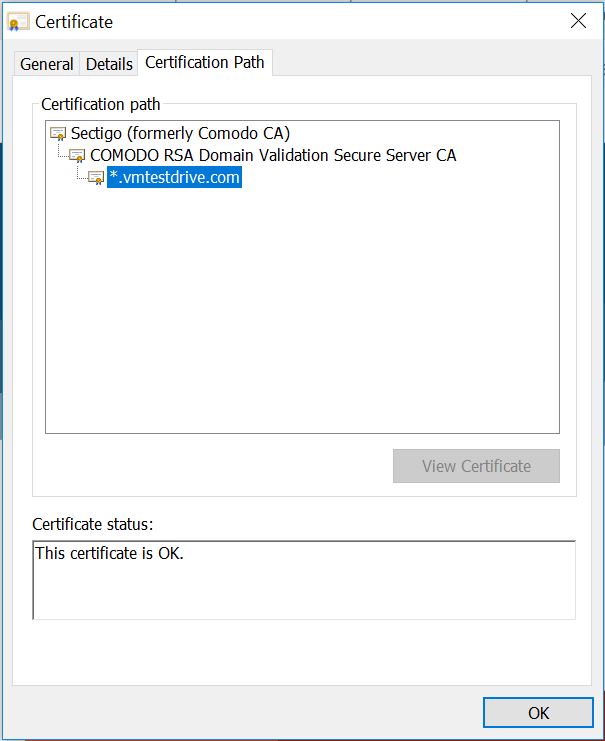
4. Click on “Certification Path” tab bring up the following:
5. Select the top level certificate, in this case, “Sectigo (formally Comodo CA)”
6. This will bring up the Root certificate as shown below, “Comodo RSA Certification Authority”. This is the first certificate we want to export.
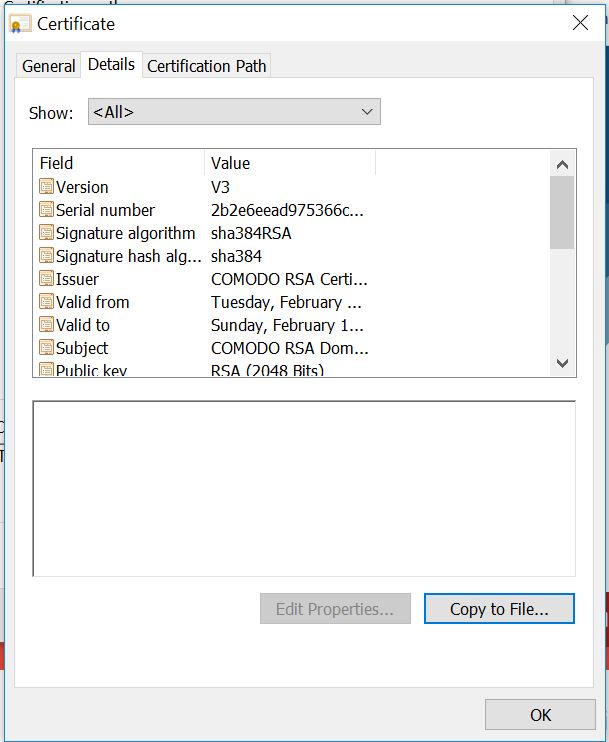
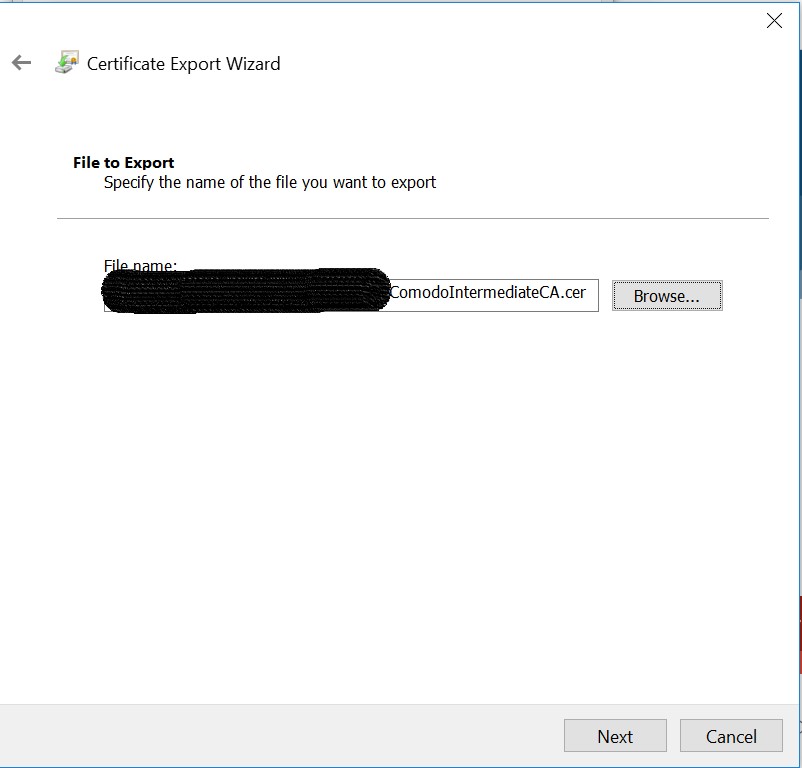
7. Click on the “Details” tab and select, “Copy to File”:
8. Take defaults and follow the wizard to export the certificate:
9. Once you export the top level Root Certificate, follow the same steps to export the Intermediate certificate. This Intermediate is chained, or trusted, by this top level Root Certificate so we need both certificates in this chain.
10. In the browser, select the Intermediate Certificate, “COMODO RSA Domain Validation Secure Server CA” and select “View Certificate”:
11. Select “Details” and “Copy to File” to export the certificate:
12. Follow wizard again to export the Intermediate Certificate:
13. You now have successfully exported both the top level Root Certificate, “Comodo RSA Certification Authority”, and the Intermediate Certificate, “COMODO RSA Domain Validation Secure Server CA”.
Once exported you need to upload them into your WMS server. It’s a simple process and the steps to upload the certifications are outlined here. Once complete, resume to step 15 below to assign the certificate(s) to your group configuration/profile.
15. Once certificates are imported into WMS, you then need to assign them to your ThinOS profile you are using under, “Groups & Configs” select the group you want to edit following steps below;
ThinOS 8.x: in the policy, browse to “Device Configuration\Security\General Settings”. Select “Auto-install Certificates” and your Certificate should show up in the list to select. Once you are done, click “Save & Publish”. The next time the device reboots, it will pick up the new Certificate.
ThinOS 9.x: in your policy, browse to “Privacy & Security\Certificates”. Here you can turn on “Auto Install Certificates” and browse to the certificates you want to upload as shown below:
This completes the process of exporting the SSL certs, uploading to WMS, and assigning them to your profile. This should resolve the issue of “SSL Certificate Authority is Unknown”.
For more assistance, check out Dell Community Forums (formally Dell TechCenter):
One of the great features of Wyse Management Suite (WMS) Pro is the ability to integrate it with Active Directory so you can log into WMS using your existing Active Directory accounts.
The process is pretty straightforward as outlined in admin guides but recently working on this with a customer I wanted to document the process with some additional details that helped.
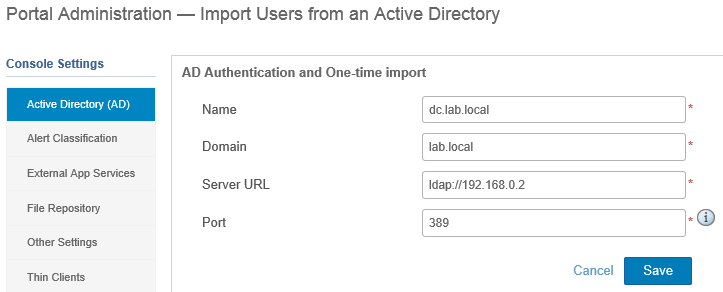
Go to ‘Portal Administration’, ‘Active Directory (AD)’
Enter your Active Directory information as outlined below:
Name: FQDN of domain controller
Domain: domain name
Server URL: ldap://ip_fqdn of domain controller
Port: 389
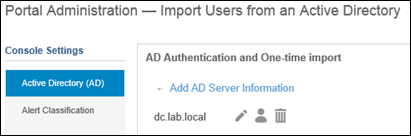
Once you click ‘Save’ and it’s successful, you will see the following screen:
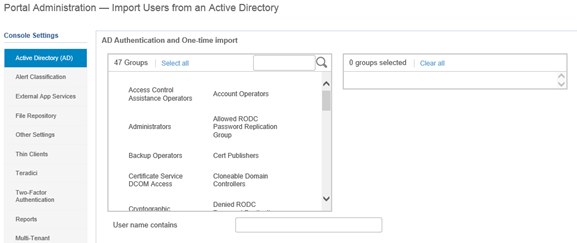
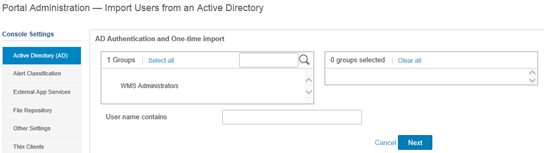
Click on the ‘icon’ to add by either Groups, Users, and also search by OU to enumerate from AD.
You will then see your existing Groups appear below:
You could also search just for a specific Group, i.e. WMS Administrators:
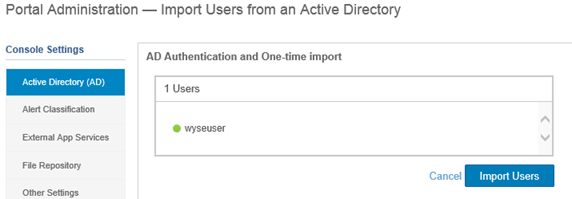
You could also search just for a specific User, i.e. wyseuser: (NOTE: User account must have email associated with account in order to show up, otherwise you will get an error message while trying to import users.
You could also search by Organizational Unit (OU), i.e. Management
Once you have imported what you choose, the users will show up under the Users tab in WMS under, ‘Unassigned Admins’. Note: This may take a few minutes to show up after importing from AD.
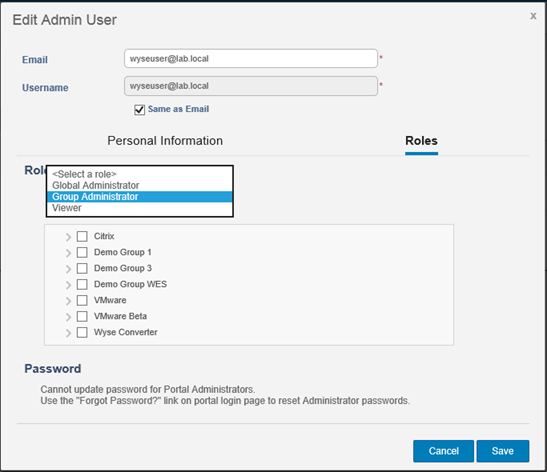
Select the account and select ‘Edit User’:
Select ‘Roles’ and assign the appropriate role for the user:
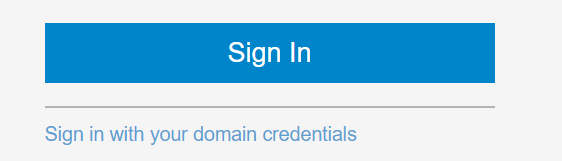
Once complete, the user will show up under the ‘Administrator(s)’ tab:
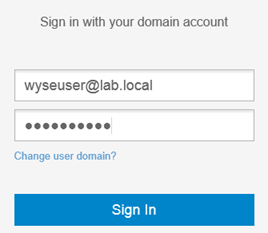
On the WMS Portal logon screen, choose ‘Sign in with your domain credentials’ to log in with your newly imported and assigned AD user.
In some recent lab testing I ran into the following error: “CCM on-prem Server authentication token is not available in configuration file.”
I got this error when attempting to pull a Windows 10 IoT Image off a Wyse 5060 client.
The fix was to push the updated Merlin package, aka boot agent, to the device prior to capturing image.
This package is already pre-loaded in the Wyse Management Suite software and listed under “Apps & Data\App Inventory\Thin Client” – MerlinPackage_Common.exe.
You will need to create and App Policy containing this package and push to the client.
To create App Policy go to, Apps & Data\App Policies\Thin Client\Add Policy
Complete the policy using the details below:
Once policy is created, go to, “Jobs\Schedule App Policy” and create your policy similar to below:
Once the policy is pushed successfully you should now be able to pull the image!
Error details:
(Status: Failed – [ERROR: CCM on-prem Server authentication token is not available in configuration file. (error code : 107).]
[ERROR STAGE: Repository validation.]
[REASON: Configuration file is missing authentication token of on prem Server.]
[SOLUTION: Make sure config file is updated with proper CCM on prem Server authentication token.]
| (107))
Hope this helps someone else down the road!
@chris_messer ~~> Subscribe to blog to get latest updates <~~
Additional support resources as noted below:
Dell TechCenter Wyse Product Support Forums – these are a great resource for getting up and running with the solutions as well as tips and tricks for troubleshooting common issues. Once you join the Dell TechCenter community you will have a variety of resources to get started!
Wyse general forum: for discussions that, for example, span multiple categories, involve end-to-end methods, heterogeneous environments, new use cases or topics not found under the support documentation or existing discussions.
Wyse thin clients: includes Cloud Connect, Linux, Windows Embedded Standard, ThinOS and zero clients for Citrix, MultiPoint Server and VMware.
Wyse software: includes Wyse Management Suite, Wyse Device Manager, Wyse WSM and Wyse Virtualization Software